 Click picture to enlarge.
So many types . . .
Primitive Technology, wilderness survival, living off the land, buckskinning, Indian crafts, Indian lore and more.
Primitive archery.
Interested in archery, I wanted to learn to make my own bow and arrows. There are lots of books and articles and websites for bow makers, but not nearly so much for arrow makers.
I have now completed a bow, with a few failed attempts along the way.
But I haven't even begun making arrows yet. Too many things to figure out or decide, like what wood to use.
The things I've read mostly talk about using 'dogwood' but they don't describe what it is. My experience with dogwood is a shade-growing small tree which has lots of lovely white flowers in the early spring. The arrow makers talk about shrubs and shoots, and straight ones at that. Nothing like the flowering tree! The plant and tree identification books I have don't really give me any idea of what the 'arrow' dogwood might be, either.
I've also tried very hard to find an easy, efficient way to manufacture arrow-shaft dowels without individually planing square shafts gradually round and then sanding them smooth. There are some plans for dowel-making jigs to use with table saws and with routers. I did make one for my router that worked reasonably well. A commercial machine that uses a similar principle is called "Shaft Shooter" and is advertised in some of the archery magazines. I think I saw it in Primitive Archer. But it costs $500!
Something else I keep reading about is using (pine) pitch. For all sorts of adhesive and sealing uses such as holding the feather fletching on an arrow, sealing seams in a birch bark canoe and many more. But I've never found any information at all on where to get it or how to prepare it. And only one source to buy it, for $10 per pound from a wood-bow maker's supply company called Bow Works in Hinton, Texas.
I finally went out and looked at the pine trees in my front yard. There was some congealed sap on the trunk of one, just below where a ring of branches leaves the trunk. I took some off with a putty knife, although most of it was pretty dry and not very sticky. The blobs just about filled a quart size plastic cottage cheese container. The I took it down the basement and put about 1/2 cup in an empty glass jar and heated it in an old low-powered microwave oven for about 6 or 7 minutes. People often melt wax and other things over a fire, but these things are often flammable, including the pitch. I have used the same microwave for rendering or processing some raw beeswax by the same method. Heat it up and pour the top part into another container to let it cool and solidify. I use empty 8 oz. plastic yogurt containers.
I've read that rosin comes from distilling the pitch, or from distilling pine sap. I want to try that, too. Rosin is an ingredient in the pitch that holds the sheet metal for engraving, embossing, and for repoussage. I want to try these crafts someday, too.
Update: April 6, 2002
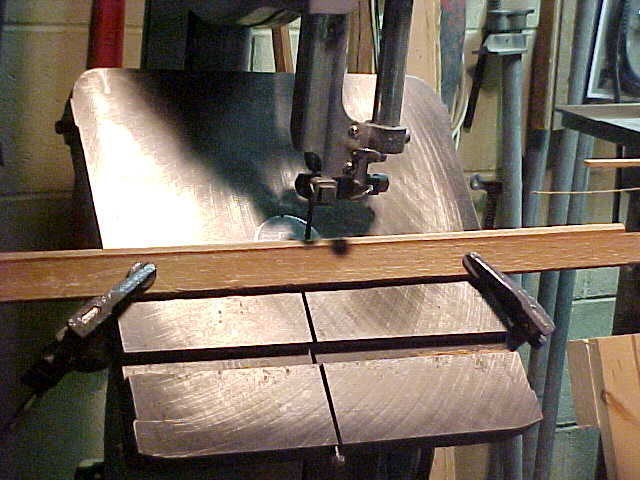
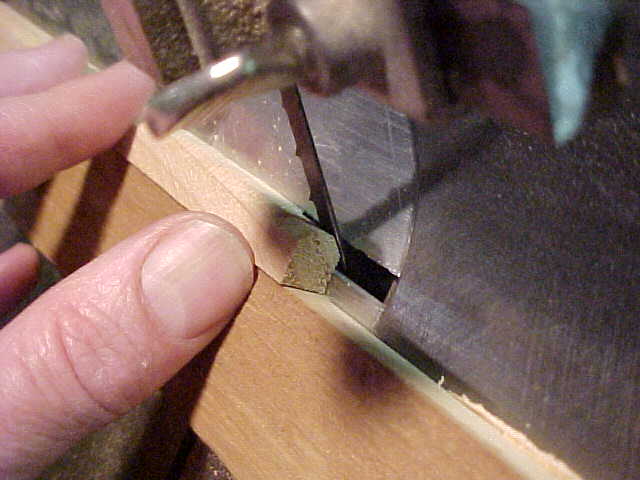
I finally started an attempt at making arrows, but not really very primitive. I bought a cedar 2 by 4 and cut it into 30 inch lengths. Then I ripped them lengthwise into 3/8 inch squares on a table saw. Next I tilted the band saw table to 45 degrees and clamped a wooden guide fence on it. Then I pushed each square shaft blank past the blade 4 times, trimming the corners off and making the squares into octagons. I also used the table saw to cut a shallow, 90 degree V-shaped groove lengthwise down the middle of another 2 by 4. The blanks rest in the groove for hand planing and it works with both square and octagonal shaped shafts. I've made pictures of the band saw setup and the planing jig because I haven't seen much about those processes in woodworking books or magazines.
Click picture to enlarge.
Overall View. Close-up.
In the close-up you can see the missing corners of the blank being shaped and even the teeth on the band saw blade. In these pictures the blade is not moving and the saw is turned off. It would help to have a blade with finer teeth.
I've planed a few of the shafts pretty close to round. They don't feel like they are going to be stiff enough, though.

 Click picture to enlarge.
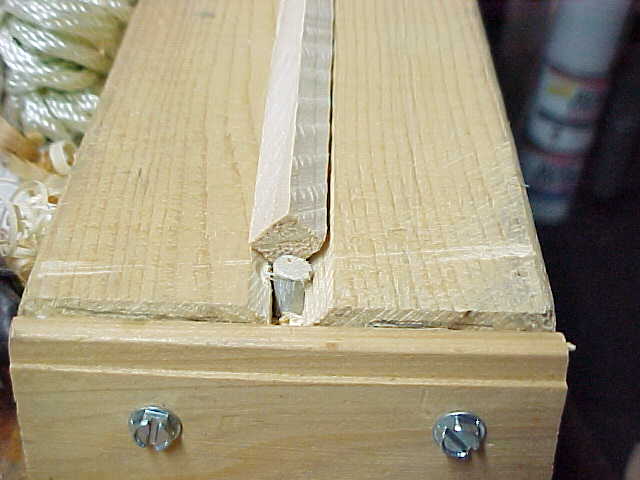
Plane Jig. Square Blank Planed Blank.
The planing jig has an end stop screwed across the end to keep the blank from sliding out. But I put it on too low. So I drilled a 1/4 inch hole down through the bottom of the Vee and put a dowel in the hole to act as the planing stop.
I still have to plane the rest - I started out with 15 blanks from the first piece of 2 by 4.
Then I still have to come up with a nice way to sand them smooth and round, and all to the same diameter. That means there may be more pictures coming!
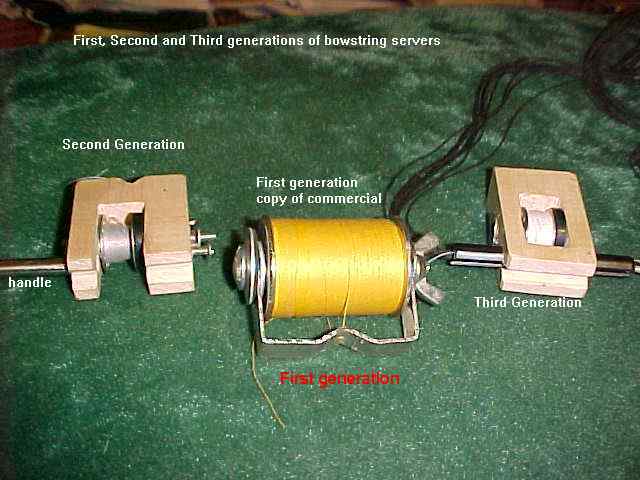
Bowstring Serving Jig
Wow! I invented a new style of bowstring serving jig. First I tried copying a commercial one, but it was very clumsy to use. (I kept dropping it as I wound around the string.)
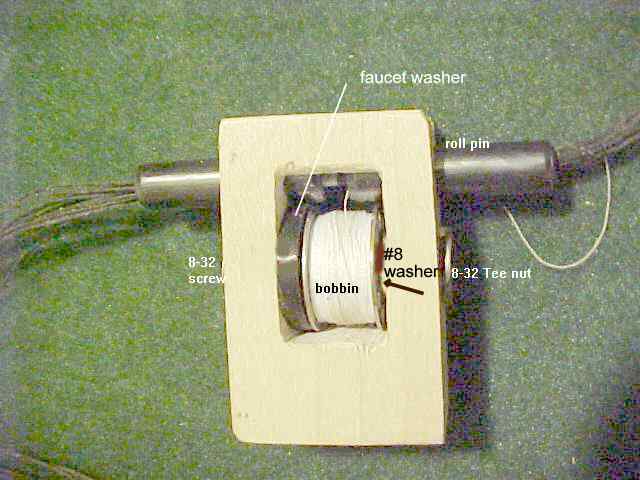
So I got to thinking about improving the balance and convenience of the tool. The first stage of improvement was better, because having the handle helped. But it's still off balance and somewhat clumsy. It has a screw for putting pressure on the faucet washer for adjusting the thread tension but it isn't really needed.
But the second stage of improvement works great! It's made of small piece of maple wood from my scrap box, plus a common class 15 ordinary sewing machine bobbin, a 1-1/2 inch long 8-32 machine screw with two washers and a Tee nut, a large, flat faucet washer and two 5/16 by 1 inch long roll or tension pins. I drilled a 3/16 inch hole through the maple block for the 8-32 screw, which serves as the axle for the bobbin, and a 21/64 inch hole through the block for the roll pins. Then I drilled holes and cut out between them to make the rectangular hole for mounting the bobbin and sawed the V-slot in the end of the block. The V-slot guides the bowstring into the slot in the roll pins. With the bow string inside the roll pins you can just twirl the serving jig around the string, using the roll pins as handles. If I let go of the jig, it just hangs on the string instead of falling to the floor and unwinding 3 extra feet of serving thread.
Take a look at the pictures for construction details.

 Click picture to enlarge.
NOTE: this page and the jig design are Copyright 2005. But if you want to produce them commercially, my licensing fee will be one production sample.
Otherwise, I would be willing to make them available on special order for $20 each, including postage in the USA.
-------home ------ Click to -----------e-mail me. -- Created on July 29, 2000; updated June 18, 2005