Making a basic rapier hilt for SCA fencing combat.
It takes me about 10 to 12 hours per hilt. It helps to make about 4 hilts of the same model in a "batch." It seems like the pommel and grip take about an hour each, as well.
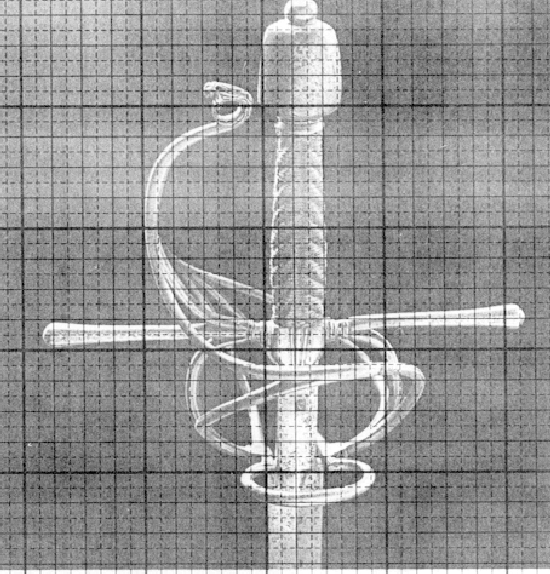
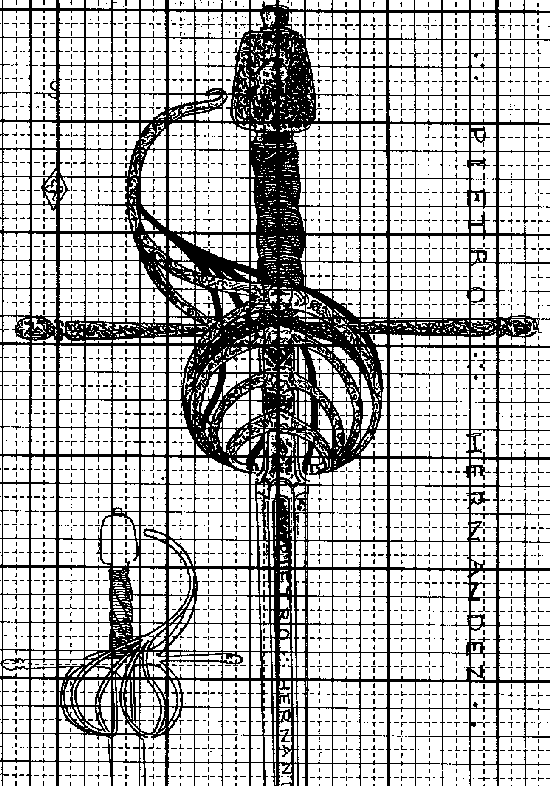
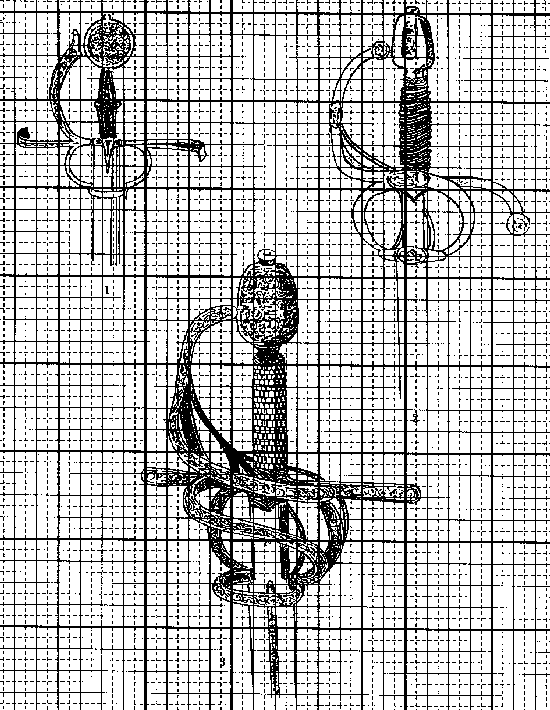
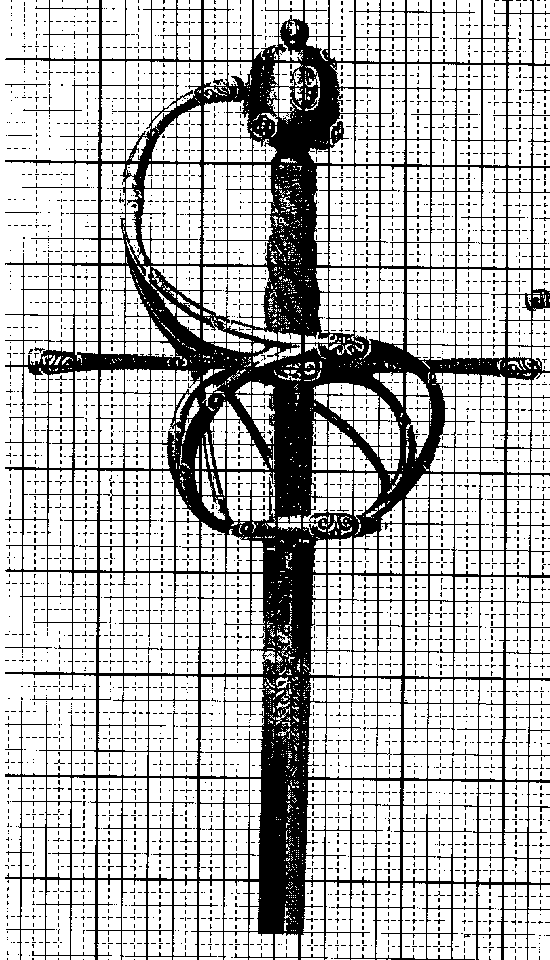
Find a picture of a nice two-ring or three-ring hilt to use as a pattern. I strongly recommend the two-ring. That's what these instructions and sketches will cover. The best books that I've found so far for example pictures are "Cut and Thrust Weapons" by Edouard Wagner, and "European & American Arms" by Claude Blair. Wagner's book is the only one to show the back sides from some of the hilts. That makes it very important, especially for us beginners. That back side is tricky, and important.
In particular, study Plate 5 in Wagner's book. Plate 6, also Plate 9 and Plate 10 are very worthwhile too. In Blair, carefully examine Plate #120. I photocopied it with an enlarging copier and then enlarged the first enlarged copy. I can make life-size pictures this way. It's easier to be sure it's really life size if the description of the sword tells the width of the cross-guard, though.
By the way, I found a very helpful product recently at a Ben Franklin Crafts store, in the sewing and quilting section. They had sheets of clear mylar plastic measuring 11" by 17" with 1/4" and 1/8" square grids printed on them. I put a sheet over the picture of the hilt I wanted to photo-copy and the enlarged copy came out with a reference grid printed on top of the sword. A sheet of the mylar costs $2.75. I went back and got a second sheet to cut in half so that it's about the same size as the book pages. I'll keep the first one full size to use for manually drawing enlarged copies of smaller pictures. This grid enlargement system is described in lots of woodworking books for enlarging their printed patterns to full construction size.
That mylar grid sheet really helps me to duplicate the proportions of the hilt more accurately. Otherwise it usually seemed like my hilts often looked a little too big. When cutting parts I'm always afraid of cutting them a little too small, so I wind up leaving them a little big so I can trim down later. But I never wind up trimming and so they end up a bit oversize.
A full size drawing or photocopy helps make a nice hilt. You can hold each piece up against the paper as you make it, correcting the size or curvature as necessary.
See the pictures of many of my hilts, too. There are a couple of dozen!
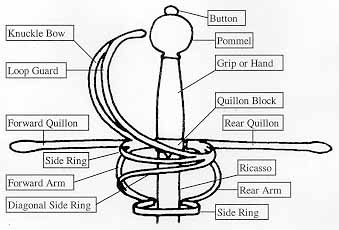
For a nice description of hilt parts and rapiers in general, got to
http://home.xnet.com/~shrike/rapier/histrap.html
which is where I got this picture: parts.jpg
Get a six or seven feet of 1/4 inch cold-rolled steel rod and at least 6" of 1/4" square bar. Key stock would be good for the square piece, but it's relatively expensive and usually plated with something that will become a poisonous vapor when you weld it. You can use more 1/4" round bar instead, but we'll need to change the instructions for that. The "no-square" instructions will come after. If you can find round 3/16" bar, it also makes a very nice, graceful looking hilt and it is quite a bit easier to bend and lighter in weight. For a fencing hilt, especially for lady fencers, 3/16" rod may be the better choice.
I do all my bending and forming with the steel cold. People often ask if I use a forge and heat the bars, but getting the steel red hot turns it black and pitted. It takes a lot of work to clean it up afterward. Also I find it very hard to hold on to red hot steel and bend it accurately. And these small bars cool off quite quickly, so you'd have to keep re-heating them, and the mandrel or form that you bend them over or around will also absorb heat from the bars and make them cool off even more quickly.
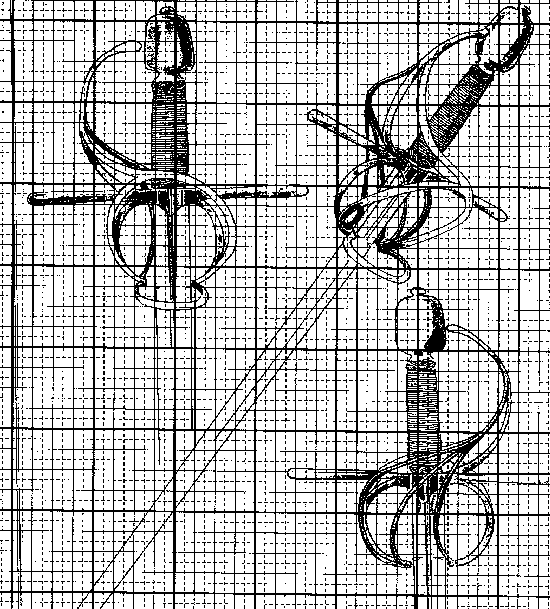
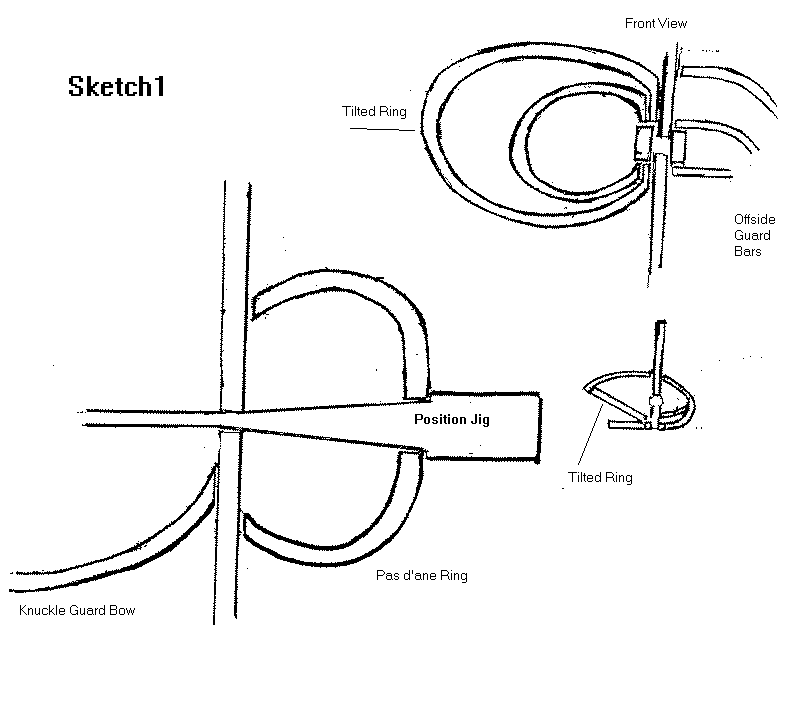
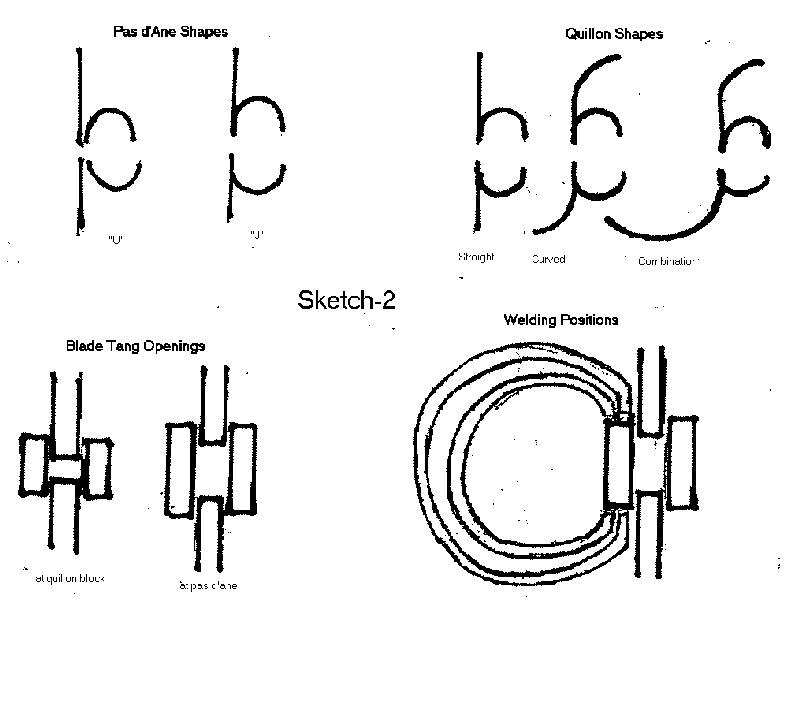
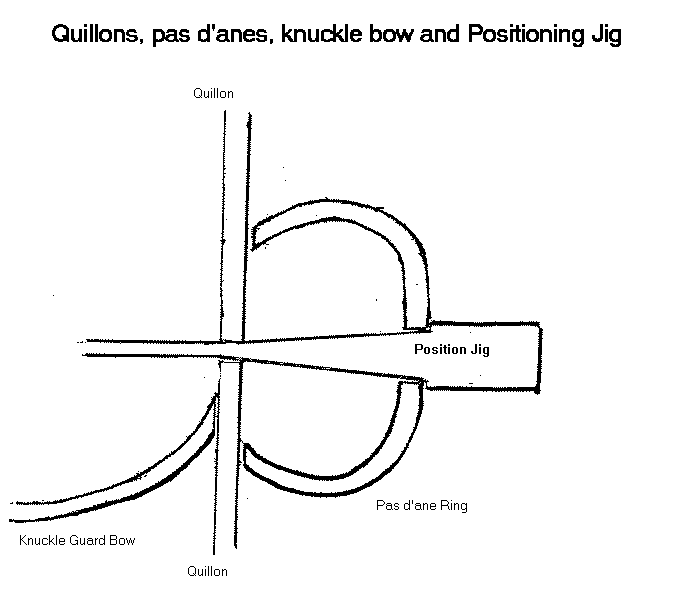
I made some rather crude sketches of the parts ('Sketch1') and their positions ('Sketch2'). They're the links in the rest of this page. There are several different areas and parts on each sketch.
For the quillon size, I went by SCA rules, which allow a maximum of 11 inches total, tip to tip. That's a bit long on some design styles, though. If you make the first one with plain, smooth, straight bars then you can trim them shorter until you like them.
Another good way to check is to make a model of the hilt with heavy copper wire or old coathanger wire.
I've tried determining sizes of original, historical hilts but none of the picture books give anything but blade length for dimensions. I often figure that the grip is 3-1/2" and use that to estimate all the other sizes.
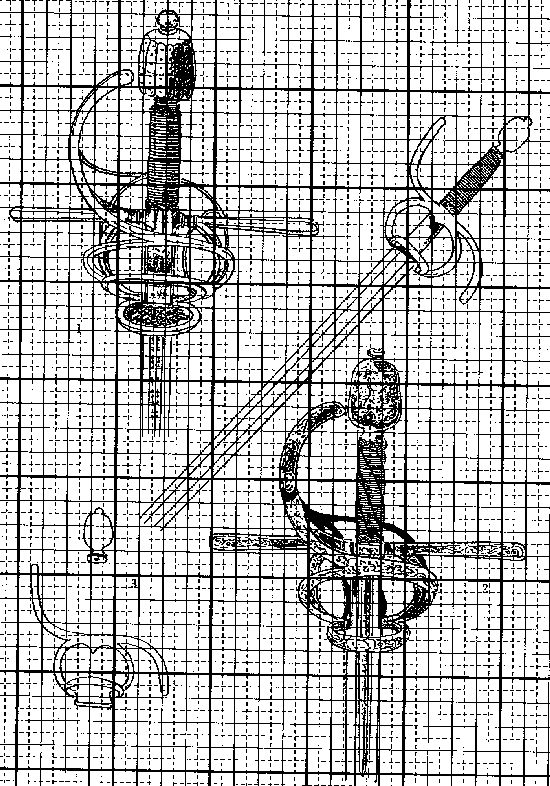
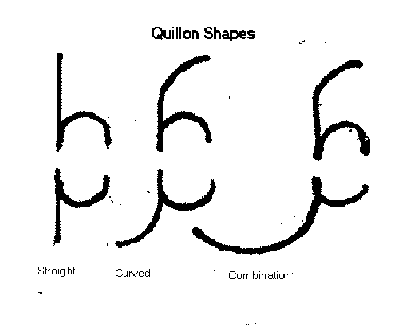
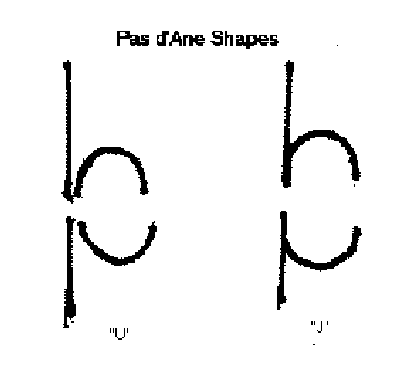
Cut off enough1/4 inch rod to make a circle 2 inches outside diameter and a circle 4 inches outside diameter. Or for a three-ring hilt, try 1-3/4", 3" and 4-1/2" circles. Be sure to make it long enough for bending, because there's usually some loss for unbent parts at the ends. I usually bend a part at the end of a 2 or 3 foot rod and then cut off that part. It's sometimes a lot easier to bend with that extra stock as a handle for bending leverage. Also cut two pieces 1 inch long and two pieces 1-1/2" long, which will become the blade tang stops and the quillon block. You will also need about 9 inches for the knuckle guard. Bend the knuckle guard and then cut it off from the rod stock. I'd recommend starting with a hilt with a straight crossguard (quillons), but it's not too much harder to use curved ones. They're easier to weld up if they're straight. If you want them curved, also bend both quillons. The quillons are easy to bend all in one piece and then separate them after they're bent. We also need two pieces bent into a "U" shape, 2 inches across and about 2 inches long to be the "pas d'anes" if I have the term right. These pieces look good made of more of the 1/4" square stock, if you have enough. A slight variation to give a more graceful look is to make them more of a "J" shape. See 'Sketch1' again. They are the loops that your first finger goes through when you hold the hilt for fencing. We still need 4 or 5 more pieces, mainly on the "back" side of the hilt, which is the side opposite the rings. For me, the left side is the back side. But you will save a lot of trouble by waiting until these pieces we've already cut and bent are welded together before trying to cut and fit the rest. And they're awfully hard to describe.
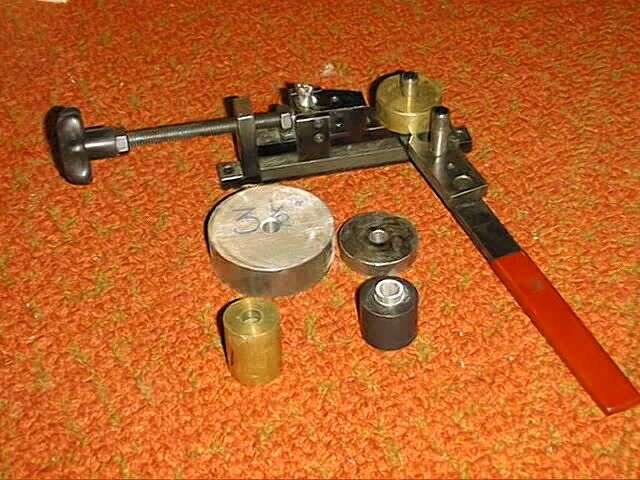
If you use long pieces of rod, you can bend them around a piece of pipe. If they're not long enough to get enough leverage to bend easily, then you need a bender. I normally use a bender like the Harbor Freight wire bender I described on the tools page. I still cut pieces fairly long, or bend the ends of long ones, so that I don't have a lot of little, short scrap pieces left over.
For some more basic information about bending, go to The Art of Bending at
http://www.concentric.net/~Porth/strippit/artnr.shtml
For a simple home-made bending jig, try http://www.flash.net/~dwwilson/ntba/archive/bjg/
And to Harbor Freight Tools - Home Page
http://www.harborfreight.com/cpi/taf/Displayitem.taf?itemnumber=35150 for details on the bender that I use the most.
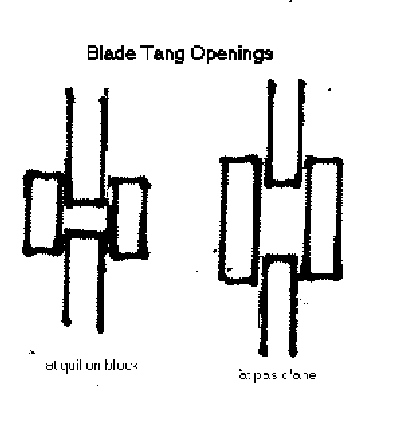
Lay both quillons and their pas d'ane U's on a firebrick. Each will look like a lower-case letter "h," arranged bottom to bottom with each other. Be sure that they're in exactly the right position. There should be a 1/4" space between the ends of the quillons and a 3/4" space between the ends of the pas d'ane U's. This space must fit the blade tang very closely. See 'Sketch2' again.
It helps a lot to have a positioning pattern for aligning them. I traced three inches of the tang and the first 2 inches of the blade onto a piece of flat steel 1" wide, 1/4" thick and 5" or 6" long. The thickness of this piece is important for making the blade openings the proper sizes. It doesn't need to be as long as the entire blade tang. Only the largest 3" of tang is important for this purpose. Again, this is shown in 'Sketch2'.
Warning! If the blade won't fit now, it probably never will.
Keep everything lined up straight while you weld. It's embarrassing to have the hilt canted at an angle to the blade!
Lay a 1" piece of 1/4" square stock across the opening between the ends of the quillons, and a 1-1/2" piece across the ends of the pas d'ane U's. Carefully center the square stock over the openings. The little pieces will be resting on the dummy tang which is between the quillons and U's.
It's convenient to have two fire bricks and lay the knuckle guard in place now, too. Weld it on when you weld the quillon block sides onto the quillons.
Weld each pair together. Weld the knuckle guard in place now, too. Be sure to weld it to the proper quillon if you're using bent ones! The quillon should curve toward the knuckle guard. Check before welding. Even with a power hack saw it's not a productive use of your time to cut the knuckle guard off the wrong quillon and then weld it onto the correct one. Another good reason for starting with straight quillons for the first hilt. Turn the assembly over and weld the other two square stock pieces onto the other side. Be careful not to weld the jig into the opening! You can just tack weld the parts and then remove the jig before finishing the welds. Then clean up the welds with the belt grinder and files.
The neater and more even you make the welds, the less work there is to do filing them all smooth. And it is really a lot of work! Most of the labor time in making the hilt is smoothing the welds. This is a warning. Get plenty of practice and work very carefully.
For round-stock quillon block and blade tang stops:
Next we'll weld on the round 1" quillon block pieces and the round 1-1/2" blade tang stop pieces. Now you need a clamping or positioning jig, like my vise-grip on a pivoting arm. Hold the already welded assembly vertically with the knuckle bow up in the air and the un-welded side of the pas d'ane U's resting on the fire brick. Put the 1-1/2" pieces of 1/4" rod next to and bridging the ends of the pas d'ane U's. This forms the rectangular opening for the blade tang to pass through and rest against. It must end up exactly the right size, so don't get too much weld filler inside but don't leave it too big, either. I always have to file this opening to fit the tang, but the less filing it takes the better I like it.
Turn the welded assembly over so that the knuckle guard side of the quillons rests on the fire brick. It will have to hang over the edge of the welding table to let the knuckle guard clear the table and brick. Lay a 1" piece of 1/4" rod across the space between quillons and weld it on. Then put the other 1" piece in position and weld it, too.
For either square or round-stock quillon block and blade tang stops: continuing the job.
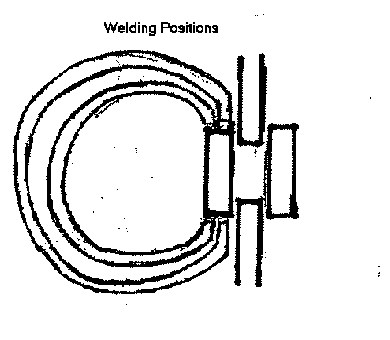
Cut an opening in the smaller ring so that the ends will just fit the ends of the blade tang stops on the pas d'anes and the larger ring ends fit across the quillon block ends. Grind the ends of the rings to about half their original thickness. The thinning of the larger ring should be with the ring tilted to about 45 degrees. Check 'Sketch2' again, looking at the right hand side, where the tilted ring is marked from both front and top views. Flatten the side of the ring that will rest against the quillon or pas d'ane. Weld on the rings. Carefully.
And now for a little bad news . . .
I don't know how to describe making the guards for the 'offhand' or smaller side of the guard. It takes some difficult, compound bending to make a pretty one. Hopefully you'll have learned enough from making the larger side to be able to handle this part. Again study Plate 5 and Plate 6. And I hope that the various pictures (Plates) give enough graphical information to be able to make this side of the guard. If not, don't despair. Quite a few rapiers I've seen pictured had only the quillons and one side ring, with no other guard at all. The one at the upper right in Plate 9 for example. Maybe this first one should be that simple. Think about it.
----home ---- back to Swordmaking Page ------e-mail me. ------- updated May 5, 2003